Showing posts with label android. Show all posts

Thursday, July 27, 2017

Tutorial How to move from Activity to Fragment and Fragment to Activity

For those who learning android programming for the first time, they will learn about android components like Java Class, XML, Activity, Fragment, Adapter, etc.


After that the next step is learn how to move from one Activity to another Activity using Intent. After learn about Activity, that they will learn about how to move from Activity to Fragment, and the Fragment to Activity

Move From Activity To Fragment


On this part, i will show you two ways how to move from Activity to Fragment:

1. Using Activity For Place a Fragment


We call the fragment in Activity's layout. So when you try to access a Fragment, just call the Activity where you set the fragment using Intent.

Here is the example :

Create a XML file name it as activity_main.xml

Layout activity_main.xml will used on class MainActivity. Code for class MainActivity.java looks like the follows :

Well, above is a class that we used as the first page when application is opened

Create a class Fragment and name it as NameFragment.java, Here is the code :

Next create layout for Fragment NameFragment name it as fragment_name.xml, here is the code :

OK, class Fragment already done. So how can we call Fragment NameFragment from MainActivity?

Create a new layout name it as activity_for_fragment_name.xml

Take a look at above code, inside tag there is an attribute class, that contains class Fragment. From where the class com.putuguna.fragmenttoactivity.NameFragment? that is the name of class Fragment that we create before, that is NameFragment.

com.putuguna.fragmenttoactivity.NameFragment contains name of package project and name of class.
com.putuguna.fragmenttoactivity : name of package project that we created
NameFragment : name of class Fragment that we created

Then create a java class for Activity NameFragment, name it as ActForFragmentNameActivity.java, the code is looks like the follows :

As we can see there is not special initialize code inside class MainActivity, it just initialize of its layout. But when this class is loaded, by using attribute class inside tagline fragment, then automatically its fragment will loaded


Calling Fragment NameFragment from MainActivity, you can do it look like the following code :

The part of the code above available on MainActivity, inside button onClick

2.  Without using Class Activity


If you create fragment without create its Activity, simple do like the following code :

Move from Fragment To Activity


If you try access an Activity from a Fragment, simply like the following code :

Yang perlu diperhatikan adalah :

.... new Intent(getActivity(), .....), getActivity() as Activity of Fragment, because on Intent's constructor required Activity and destination class , so we use getActivity() to take fragment's activity.
And also before you do startActivity(), first write getActivity() then startActivity().
That's all. Sorry for worst english. Thank you.

Wednesday, February 15, 2017

Android Take Image From Camera or Gallery Using EasyImage Library

In development process that I have done, there are one project that had features "open image" from camera or gallery for displayed on application. For example like change the profile picture, upload some image, etc.

Today I going to show you how to took image from camera or gallery using EasyImage Library. This library pretty easy to use. You don't need to write much code (like manual way), because this library has function that specific open image from camera and open from gallery.

Let's start the steps one by one ..

Library 


In this project, I used some libraries. Please compile the following libraries in build.gradle (Module : app) :

compile 'com.github.jkwiecien:EasyImage:1.3.1'
compile 'com.github.bumptech.glide:glide:3.7.0'

On your second gradle, put the following code in build.gradle(Project:ProjectName)
 
allprojects {
    repositories {
        jcenter()
        maven { url 'https://jitpack.io' } //add this line
    }
}
 
 EasyImage is the library for open image from camera or gallery, and Glide is a library that used to load image.

AndroidManifest


In order to able to access and take image/photo from Gallery, then you need a permission on your AndroidManifest.xml :

<uses-permission android:name="android.permission.WRITE_EXTERNAL_STORAGE"/>

Layout


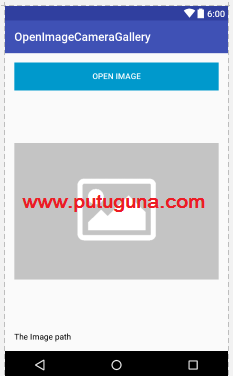
The layout is not to complicated, I just uses one layout that contains button load image, imageview for display image and textview for display the path of the image. Give name as activity_main.xml and paste the following code :

The result look like the following Figure 1 :

Gambar 1
For the placeholder (the grey image above), you can find here.

File Java


I have created the method for open Camera and Gallery when button Open Image has clicked, with hope you easy to understand the steps. This java file named as MainActivity.java, paste the following code :

The result will look like the following giff :


That's all the tutorial about how to take image from gallery and camera using library EasyImage. Hope it useful.

Thursday, January 26, 2017

Displaying Data On Android (Retrofit 2.0 GET) From Server PHP + MySQL

Continuing the previous post about how to input data from android to server that made using PHP + MySQL, then today i going to create an article that still related with database (PHP and MySQL).

This article will talking about how to displaying data on android from server that made using PHP and MySQL. The server hostinged in localhost.

 
In android I using retrofit 2.0 as the tool that help me to do communicate data between android and server. Because this process just do displaying data, then the method that will used is method GET (Retrofit)

By following this tutorial until the end, you will learn 2 thing. First, you will learn how to create your own server using PHP and MySQL, and the second you will learn how to use retrofit (Method GET).

Also see : How to GET using retrofit 2.0 by paramter (using dummy server from apiary)

Creating Database


Database that uses still same as the previous article that talking about how to insert data from Android to Server (PHP+MySQL). There is no changes or replaced. You can follow the steps how to create the database from this article.

Code In PHP Project


In the php project, there are several php class that uses :
  • Connection.php
  • DisplayJsonFood.php

1. Connection.php

This file used to connecting database that we have created to out php project. Below is the full code of Connection.php :

2. DisplayJsonFood.php

This file used to displaying datas from database be a json format. Why json format? Becase Android cannot straight access the database, so between php and android communicate by using JSON. Below is the full code of this file :

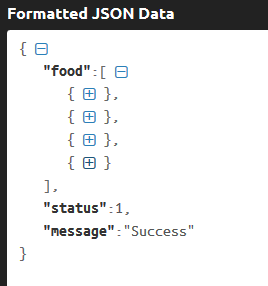
the above code will displaying json look like the follows  :

Because the data food is possibility more that one, then on json above, data saved inside array tagline. The array tagline that i meant is []. Inside the [] there is tagline {}. Tagline {} called as object.

Example : If there are four datas in database, then the object inside tagline [] also became four,  so the form look like : [{},{},{},{}]. Please take a look at the following image :


On above image, beside the tagline [] and {}, also there are two attributes, there are status and message.

If the process successful, the the value of attribute status became "1", and the massage became "success". And in the process is failed, the value of attribute status became "0", and the message became "Failed while displaying data".

Code In Android Project


There are several java classes on project android required. These classes look like the follows :
  • FoodModel.java
  • ListFoodModel.java
  • LoggingInterceptor.java
  • ApiService.java
  • ApiClient.java
  • FoodAdapter.java
  • MainActivity.java

1. FoodModel.java

This file created as an object. Inside this file contains method getter and setter. Below is the full code of FoodModel.java :

2. ListFoodModel.java

Perhaps serveral of you have a questions what the different between FoodModel.java and ListFoodModel.java?

Here, as you can see at the json output, the object located inside array tagline, in order to make a similar form between model in android and the json format, then we create list that encapsule the FoodModel.java

In order to easy understand, please take a look at ListFoodModel.java, here :

3. LoggingInterceptor.java

This file used to see the output of the process displaying data. If there is an error, this class file know what the causes of the error. The output will appears on logcat. Below is the full code of this file :

4. ApiService.java

This file is an interface. Inside this file contains method GET that used to get data from json. The full code of this file is look like the follows :

5. ApiClient.java

This file contains the target URL that will used. And also this class contains the initialized of retrofit. The following is the full code :

6. FoodAdapter.java

This file used to set data that got from server to the each textview. The full code is like the follows :

7. MainActivity.java

MainActivity is the main class that contains all of the process of the above class. The full code of MainActivity is look like the follows :

That's the several steps how to display data on android from database (server made using PHP and MySQL). Hope this article useful. Thank you.

Download the project by clicking the following image


Retrofit Android Insert Data To Database (Server Using : PHP + MySQL)

In previous posts, I have created a tutorial that show process input data to server using dummy server (apiary), means there is no data that inserted do server. Apiary was used just for testing the process of the application.


I my previous tutorial that I created using apiary as server just focused to explain about method GET and POST on Retrofit, how to send data using method GET or POST. There is no PHP file.

But, today I going to write article about how to input data to database from android application. The database using MySQL (Localhost/phpMyAdmin) and the server made from PHP.

To transfer data to server, on Android I using external library call retrofit 2.0. Retrofit will helps us to send data to database.

In PHP file, I uses PDO as the way to connecting between PHP and database (MySQL)

Creating Database MySQL


The first thing that we have to do is creating database. You can create the database MySQL from anywhere, from example from HeidiSQL, MySQL Server or PhphMyAdmin. In this case I uses PhpMyAdmin to creating database.

Recommeded : Android Create, Read, Update, Delete data in Firebase Firestore

1. Open localhost/phpmyadmin (make sure your xampp has been on)

2. Then you will redirected to the page that looks like the following Figure 1. To create database, choose New (menu in Yellow)

Figure 1

3. After that, write your database name and choose the type of the database. Take a look at the following Figure 2

Figure 2

Create database name as : loginphpandroid
Choose the type : utf8_general_ci

4. After your database done, now create the Table. To create the Table click menu new below your database name. Take a look at Figure 3 below

Figure 3
After you click the menu new (menu in yellow), the you will redirecting to the page where you can write your Table's name.

5. To create name of your Table, please take a look at the Figure 4

Figure 4
Guidelines of  Figure 4 :
  • Give the name of the Table as : Food
  • Choose number of row in table Food
  • Then choose Go

6.  After the table has done, now create the attributes/row in Table Food. Take a look at the following Figure 4.

Figure 5

Guideline of Figure 5 :
  • Give name for the first attribute as idfood, its type :  INT
  • Set idfood as Primary Key
  • Because the attribute idfood is primary key, then checklist A_I (Auto Increment).
  • Give name for the second attribute as foodname, its type VARCHAR
  • Give name for the third attribute as foodqty, its type INT
  • If done, then choose Save

Oke the database is ready to use. Now time to configure code of the PHP and Android project.

PHP Code


Recommended : Create rating and review look like Google Play Store Android

On PHP project that I created contains several PHP classes. Among that PHP files, I placed on different package. For clearly about the folder structure of the project, just take a look at the following figure 6

Figure 6


1. Connection.php

This file used to connecting php project that created to the database. If connected, then we allowed to input data either from Mobile or Form HTML. Below is the full code of Connection.php  :

2. InsertFood.php

This file used to insert data that get from users to the database. In this data gotten from Mobile Android. Below is the full code of InsertFood.php :

Attention! There are several codes that I have to explain:

$response = array()

The code above created for save the response in json form.

//cek is the row was inserted or not 
if($sqlInsert){     
    //success inserted     
    $response["success"] = 1;     
    $response["message"] = "Food successful inserted!";
    echo json_encode($response);
}else{     
    //failed inserted     
    $response["success"] = 0;     
    $response["message"] = "Failed while insert data";
    echo json_encode($response);}

The code above will do checking. Is the input process has success or not. If success the response will like the follows :
  • success = 1
  • message = Food successful inserted!
When program do echo json_encode($rensponse), then it will displaying output json like the follows :

{"success":1,"message":"Food successful inserted!"}

If the process if falied, the the response that will like the follows :
  • success = 0
  • message = "Failed while insert data"
So when program do echo json_encode($response), the output json will display like the follows :

{"success":0,"message":"Failed while insert data"}

That json response will used in mobile, and will displaying on the Toast message.

Android Code


Recommended : Simply Login Using Firebase UI (No need API anymore)

In this project I using Retrofit 2.0 to help this project send or receive data from android to server.

1. Library

As always the first thing you do before continue project is compile the libraries that needed in the project. In this project compile the following libraries :

//add the following libraries 
compile 'com.google.code.gson:gson:2.6.2'
compile 'com.squareup.retrofit2:retrofit:2.0.2' 
compile 'com.squareup.retrofit2:converter-gson:2.0.2'

2. Android Manifest

On AndroidManifest add user permission for internet, look like the follows :

<uses-permission android:name="android.permission.INTERNET"/>

3. Layout

There are several layout that used in this project :
  • activity_main.xml
  • popup_insert_food.xml
Create layout activity_main.xml, then paste the following code :

Next create layout popup_insert_food.xml. This layout contains two Edit Text for foodName dan foodQty. In its process this layout will appears on the popup. Paste the following code :


4. Java classes

There are several java classes that need in order to do insert data to the database, there are :
  • ApiService.java
  • ApiClient.java
  • LoggingInterceptors.java
  • InsertFoodResponseModel.java
  • MainActivity.java
This interface contains method that used to send data to server. Paste the following code :

This class contains the URL that used in this project. And also in this class contains initialized of the retrofit. Paste the following code :

Take a look at the URL. 192.168.43.147 is IP from my computer. And AndroidPhpLogin my project folder that located in localhost (htdocs). Change the IP/URL and the project folder name with your own.

This class used to save the response of the json from server (Take a look that the json that i have explained above in php code). Paste the following code :

Create class LoggingInterceptors.java. This class used to see the output of the input process to the server.

Why use this class? Because in retrofit we will face a little bit difficulty to see the result, especially the URL and the JSON. You can see the result on logcat. The full code on LoggingInterceptor.java is like the follows  :

Last is MainActivity.java. All the process and above classes will unite in this class. The full code of MainActivity.java is like the follows :

Demikian beberapa langkah yang dapat saya sampaikan tentang cara meng input data dari Android ke Database menggunakan Server yang dibuat dari Native PHP.
That's all about the steps how to input data from android to server made from PHP and MySQL.

If there are unclear about the steps above, feel-free to asked me. Thank you.

Download the project by clicking the following image


Friday, January 20, 2017

Android Custom Popup Using AlertDialog And Dialog

There are more that one how to create a popup view in android. Generally developer using two ways for creating it, there are :
  1. AlertDialog.Builder()
  2. Dialog()
The default design of AlertDialog actually used for display message that had two option, YES or NO or something related that have two option.

But Dialog is a little bit different. Dialog used to display popup that have a specific function, maybe for input data, login, register or something like that. Generally :
  • If people uses Dialog, it must be contains external layout.
  • If people uses AlertDialog, it must be for display message that had two option, YES or NO
Correct me if i'm wrong.

But it's just on theory, in fact much of developer creating popup that using external layout (red : custom dialog), event it for AlertDialog or Dialog.
In video above, i created a same popup view using two different Dialog. These are AlertDialog and Dialog.

On that video, the external layout is same, i just use one layout for external layout named layout_alert_dialog.xml. Here is the layout :

And this is the layout of activity_main.xml :


1. Popup using AlertDialog


The set the external layout into your AlertDialog is by using LayoutInflater. After that, you just need to setView() in your builder (look at the code above)

Take a look at this code : final AlertDialog alertDialog = builder.show(); Why we have to write that code?

The answer is because if you use a custom button, you cannot find method for dismiss the AlertDialog. So by using the code, then you can find the method dismiss by type alertDialog.dismiss();

The AlertDialog has default button called NegativeButton and PositiveButton. If you use that default button, you will easy to dismiss the alert dialog by using the following code :

builder.setPositiveButton("OK", new DialogInterface.OnClickListener() {
    @Override    
    public void onClick(DialogInterface dialogInterface, int i) {
        dialogInterface.dismiss();
    }
});

That code creating the button OK, inside the onClickListener contains DialogInterface, so you easy dismiss the dialog by using dialogInterface.dismiss();


2. Popup using Dialog


I think it more easy creating a popup view by using Dialog, like code above, after you define the Dialog, you just type setContentView(R.layout.your_layout), don't need LayoutInflater method.  

Take a look at this code :

dialog.requestWindowFeature(Window.FEATURE_NO_TITLE);

That code used to hide or remove the title space. I mean the title of Dialog. But if you want to display the title, that remove that code and type like this : dialog.setTitle("your dialog title");

Take a look at this code :

dialog.getWindow().setLayout(WindowManager.LayoutParams.MATCH_PARENT, WindowManager.LayoutParams.WRAP_CONTENT);

That code user to set height and width of the Dialog. Why use that code? Because if you remove the title space, the dialog automatically the width and height set to WRAP_CONTENT. So we set the weight and height again. In this Dialog, i set the height as WRAP_CONTENT and the width as MATCH_PARENT.

To dismiss the dialog, you can find dismiss() method, just called inside the custom button dialog.dismiss()


Hope that poor tutorial can helps you to create popup dialog. Thank you.

Like our fans page to get new update :


Link Download Project

Friday, January 6, 2017

Android Populating Different View/Layout On RecyclerView's Item

Sometime on your recyclerview's item, you need to place different view/layout on each item. For example on item index 0 you need to place a form login and on item index 1 you need to place a form register, etc.


Okay, that's the imagine of how to place a different layout on recyclerview's item. Now we start the coding.

PREPARATION

Compile the following library on your build.gradle (app:module)

compile 'com.android.support:recyclerview-v7:25.0.0'

IMPLEMENTATION

This project place 3 different item on recyclerview's item. So first we create all the layout before start java code

1. activity_main.xml

2. view_input_usernamepassword.xml 

3. view_please_wait.xml

4. view_detail_usernamepassword.xml

After the layouts are finish, now we create all the java class that we used on this project. Start from :
 
1. ItemModel.java

In order program know that item index 0 for Layout A, item index 1 for Layout B and etc, you have to give an indicator in your Object/Mode/Data before transfer to your adapter.

In this project I put an index inside my model class as an indicator. The model namely as ItemModel.java. Paste the following code :

2. ViewAdapter.java

Like i explained above (on the first paragraph), you have to create you inner class in ViewHolder (Whatever how much it is). If you wanna put 4 different layout, so create 4 different inner class of ViewHolder.

After that, you should to extends RecyclerView.Adapter<RecyclerView.ViewHolder> and then implement all of its methods.

Which method that explain that index 1 for layout A and etc?

For that, you have to override method getItemViewType(int position) manually. Create the condition using if and else. On this method you will use the indicator of your model as the key.

@Override
public int getItemViewType(int position) {
    ItemModel item = mListItemModel.get(position);
    if(item.getIndex()==0){
        return 0;
    }else if(item.getIndex()==1){
        return 1;
    }else if(item.getIndex()==2){
        return 2;
    }
    return super.getItemViewType(position);
}

These index or number got from model that we input on MainActivity (explained later).

After you create the condition, in onCreateViewHolder(ViewGroup parent, int viewType) you have to create the condition using case (or anything that related!). The logic is, if method getItemViewType() return index x, than put Layout x. Take a look at the code follows :

To get that the layout x has been return on method onCreateViewHolder(ViewGroup parent, int viewType), you must use an instanceof on method onBindViewHolder(RecyclerView.ViewHolder holder, final int position) . Take a look at the following sample code :

I hope you'll understand how to steps to create a complex adapter like above. Here is the full code of ViewAdapter.java :

3. MainActivity.java

In this class, as usual, just to set the data, define the recyclerview and set the adapter's data to recyclerview. Here the full code of MainActivity.java :

That's all. Compile and run the project. Hope it works well. Thank you.

Thursday, January 5, 2017

Android Tutorial - Create Keyboard For Input PIN

You arrived at this page, must be looking for a easy tutorial for create a input PIN board. Right? hehe don't take seriously.

In internet you can find much tutorial how to create a input PIN board, you can follow one of them. In this tutorial, i also try to share about how to create a board for input PIN. Perhaps this tutorial the code is not efficient, but at least, i create it structurally, with you people read this article is easy to understand.

Final Result

Let start the coding ....

1. In directory res/drawable


Download this icon DELETE and EXIT or you can use your own. After downloaded place those icon in drawable directory.

Create new xml file, give it name as non_selected_item.xml. This file used as background color of indicator digit (when no filled a digit). Paste the following code :

Create new xml file, give it name as selected_item.xml. This file used as background color of indicator digit (when filled by a digit). Paste the following code :

Create new xml file, give it name as press_button_white_transparant.xml. This file used as background when the digit number is pressed. Paste the following code :

2. In directory res/values

colors.xml

dimens.xml

styles.xml

strings.xml

3. In directory res/layout

There is one layout that we use to create a keyboard. In this case i use activity_main.xml as the layout.  Paste the following code :

4. In your main package or in your java class, paste the following code. In this project i hosting the code in MainActivity.java

In every click on the key number, do like the following code :

mFrameNumber1.setOnClickListener(new View.OnClickListener() {
    @Override    public void onClick(View v) {
        if(mListPin.size() <=3){
            mListPin.add("1");
            conditioningPinButton();
        }else{

        }

    }
});

On code above, when number 1 is clicked/pressed, we'll save digit 1 to the list. If the list size less that 3, we can still add number to the list.

Full code of MainActivity.java :

That's all about the steps how to create keyboard for input PIN. Watch the following video for the final result.

Saturday, December 24, 2016

Android Tutorial Create Simple Splash Screen Using Thread

Hi! Today i going to share about Splash Screen. Yeah how to display splash screen using Thread. It not to difficult if you understand about Thread.

What is actually Thread means?

A thread is an execution context, which is all the information a CPU needs to execute a stream of instructions.


Suppose you're reading a book, and you want to take a break right now, but you want to be able to come back and resume reading from the exact point where you stopped. One way to achieve that is by jotting down the page number, line number, and word number. So your execution context for reading a book is these 3 numbers.

More, you can read HERE

Back to the main topic, to create a splash screen by follow this tutorial, so the things that you have to do is like the following preparation :

  1. Image, if you don't have an image, you find find much on Google Image
  2. activity_main.xml
  3. MainActivity.java
See also :  How to change language on apps without open menu setting. You can read more HERE

Modify your activity_main.xml, and paste the following code :

change android:background="@drawable/paper" with your image. And don't forget set the progressbar GONE.

Modify your MainActivity.java, please take a look of some code below :

A normal splash page is need a full screen. It means the action bar or something like that must be hidden. The following code will make the screen is full

requestWindowFeature(Window.FEATURE_NO_TITLE);
getWindow().setFlags(WindowManager.LayoutParams.FLAG_FULLSCREEN,
        WindowManager.LayoutParams.FLAG_FULLSCREEN);

setContentView(R.layout.activity_splash_screen);
getSupportActionBar().hide();


Before enter to the thread, in your onCreate set the progressBar is VISIBLE. And after two second, the progressbar will GONE and the activity will move to the next activity. Take a look at the following code :

Handler handler = new Handler();
handler.postDelayed(new Runnable(){
    @Override    public void run(){
        progressBar.setVisibility(View.GONE);
        Intent intent  = new Intent(SplashScreenActivity.this, BeforeMainActivity.class);
        intent.addFlags(Intent.FLAG_ACTIVITY_CLEAR_TOP|Intent.FLAG_ACTIVITY_NEW_TASK);
        startActivity(intent);;
        finish();
    }
}, SPLASH_DELAY);

That'ss all about how to create splash screen using Thread. Hope it helps. Thank you

Friday, December 16, 2016

Tutorial Upload/Share Video To Youtube From Own Application

Today i going to share a tutorial about how to share/upload video to youtube from android application that we created.


In this tutorial we'll do some steps, like :
  • Browse the video in your phone gallery
  • Select the video
  • Play the video in VideoView before uploading
  • Upload the video to youtube

For easy to understanding, i created a method for every function, hope you'll get what is the process look likes

Now let's create the layout, give it name activity_main.xml, and then paste the following code :

We used VideoView for display and play the video.

In your java class, there are some method that will called during the process, there are :

1. Select the video from gallery and displaying on the VideoView


2. Generate the video path from gallery

3. Get Content URI From path and share video to youtube


There are the method that i created in this project, hope your understand the process from the begin until the end (Video uploaded).

Here the full code :

That's all tutorial about how to upload/share video to youtube from your android application. Hope it helps

Thursday, December 15, 2016

Tutorial Android Force Close Exception Handler

In software development, we must be faced some of errors. One of the error is force close. There are much causes of force close :
  • The value of attribute is null
  • The activity hasn't defined in AndroidManifest.xml
  • etc
If your application is force close, it will appears a popup unfortunately your app has stopped working.

But this tutorial will handle it. By this tutorial, if your application face an error force close, it won't show a popup nfortunately your app has stopped working. , but the application will open an activity that you chosen.


Maybe the main process like the following :
If Activity B is force close, then go to the MainActivity

PREPARATION


Create 2 java classes :
  1. ForceCloseException.java
  2. ForceCloseDebugge

Now modify ForceCloseException.java, so look likes the following code :


Take a look at the code above, exactly this code :

Intent intent = new Intent(myContext, myContext.getClass());

you can change myContext.getClass() with activity that you wanna open if force close happens. myContext.getClass() is current activity.

Modify ForceCloseDebugger.java, so look likes the following code :


ForceCloseDebugger.java help you to see the causes of the error in your Android Studio's logcat.


USAGE


Put ForceCloseDebugger.handle(this); in onCreate() in your activity

For example how the usage :


That's all.

Friday, December 9, 2016

Tutorial Watch Youtube's Video From Own Android Application

Today i going to share a tutorial integrated with Youtube. Exactly how to display youtube video into your own android application.


We using Youtube Android API and must be activated. Then we create the credentials. For more information please go through Youtube Android Player API.

See also how to login using facebook


ACTIVATED THE YOUTUBE API KEY AND GET THE CREDENTIAL


1. Go to Developer Console
2. Create New Project or use an existing project

Create project

3. If you choose to create new project, then fill your project name

Fill the project name

4. Take a look to API Youtube, and click Youtube Data API


Youtube data API

5. Enable the Youtube Data API

Enable

6. Create credential by clicked the button Create Credential


Create the credential

7. Fill the credential field

Credential field

9. Here it is, the credentials

The credentials


That's all the steps how to enable the Youtube API and create the credentials on your project. Now time to start the Android project.


CREATE ANDROID STUDIO PROJECT


Download the latest version of Youtube Android Player API, HERE. Extract the zip file and find the YoutubeAndroidPlayerApi.jar.

Place the YoutubeAndroidPlayerApi.jar in your project's libs folder. Right click on the jar, choose menu Add As Library.

Create one layout :

  1. activity_main.xml
Create two java classes :
  1. Constant.java
  2. MainActivity.java
After you creating all layout and java classes, now modify these layout and java classes one by one. 

Modify your activity_main.xml, paste the following code :

Modify your Constant.java, define your YOUTUBE API KEY and the YOUTUBE VIDEO ID here. You can find out the YOUTUBE VIDEO ID on the URL.

Example the URL is : https://www.youtube.com/watch?v=WhRaCA9bC9kWhRaCA9bC9k is the video ID.

take a look at the following code :

Last, modify your MainActivity.java, MainActivity.java has to extends YoutubeBaseActivity. Paste the following code :

Don't forget to add INTERNET permission in your AndroidManifest.xml :

<uses-permission android:name="android.permission.INTERNET"/>

DOWNLOAD THE PROJECT HERE : GITHUB LINK

Monday, December 5, 2016

Android Get Value Of List Checkbox And Displaying On Other Activity As A List

Have you work with checkbox? exactly list of checkbox. I pretty sure you have worked with it and you may agree with me if you are newbie in android, it feels so difficult to get the value of list checkbox and display to other activity, right? I was felt it. hahaha


PREPARATION


Compile this libraries in your build.gradle (Module : app) :

compile 'com.android.support:recyclerview-v7:25.0.1'
compile 'com.google.code.gson:gson:2.6.2'

then, create four xml layouts and one menu in your res/menu:
  1. activity_main.xml 
  2. second_activity.xml
  3. activity_detail.xml || this layout used in your Adapter
  4. add_item.xml || popup layout
  5. main_menu.xml 
and, create some java classes :
  1. MainActivity.java
  2. SecondActivity.java
  3. ItemAdapter.java
  4. Constants.java || this java class for save all our string value 

IMPLEMENTATION


1. Modify your activity_main.xml, paste the following code :

2. Modify your second_activity.xml, paste the following code :

3. Modify your activity_detail.xml, paste the following code :

4. Modify your add_item.xml, paste the following code :

5. Modify your main_menu.xml in directory res/menu/. Paste the following code :

After all of file xmls have been modified, now modify all of your java classes

6. Modify your Constants.java. This java class used to save our string value. In this case, just save string value of sharedPreferences. Paste the following code :

7. Modify your ItemAdapter.java. This java class used to set your added item using holder. Paste the following code :

Please take a look clearly at the code above, there is a method namely getSelectedString() and return a list. That method used in checkbox state condition. Gson used to format list item chosen as a string and store using SharedPreferences.

8. Modify your MainActivity.java. Paste the following code :

In MainActivity.java, we do add the item by using the action bar menu. And main_menu.xml used in this class.

9. Finally, Modify your SecondActivity.java. In this class we'll display all the checkbox value that has been chosen as a list. Because we stored the data in SharedPreferences, so first we have to format or convert the string value that we got from SharedPreferences to Array using Gson. Paste the following code :

DOWNLOAD THE PROJECT HERE : LINK GITHUB

Tutorial Image Transition Look Likes On Google Play When Image Clicked

Today i will share about Image transition. This image transition is look likes newer google play transition. When you clicked the image, it look like come out from its place. And when you back to the previous activity, the image will be back to its place.


That effect using ActivityOpstionCompat. How can it come back to its place or frame? because it's using TAG that placed in Activity where the image will shown.

IMPLEMENTATION


Compile the following libraries in your build.gradle(Module : apps) :

compile 'com.android.support:recyclerview-v7:23.4.0'
compile 'com.android.support:cardview-v7:23.4.0'
compile 'com.android.support:design:23.4.0'

The effect that we'll use is default from the design support 23.4.0. Next, prepare some xml layouts and java classes :
  1. ImageAdapter.java > We set the image to the imageview
  2. ImageModel.java > Object where the image place before set to the ImageView
  3. MainActivity.java > We set listview with adapter
  4. SecondActivity.java > The image will appears here
  5. activity_detail_layout.xml > The layout of SecondActivity.java
  6. activity_main.xml > The layout of MainActivity.java
  7. item_row.xml > The layout of ImageAdapter.java
Next we modify every xml layout and classed, like the following codes :

activity_detail_layout.xml
 
<?xml version="1.0" encoding="utf-8"?>
<LinearLayout xmlns:android="http://schemas.android.com/apk/res/android"
    android:orientation="vertical" android:layout_width="match_parent"
    android:layout_height="match_parent">

    <ImageView
        android:id="@+id/detail_image"
        android:layout_width="match_parent"
        android:layout_height="300dp"
        android:scaleType="fitXY"
        android:src="@drawable/paketayam"/>

    <TextView
        android:id="@+id/name_image"
        android:layout_width="match_parent"
        android:layout_height="wrap_content"
        android:text="Name Of Image"/>

    <TextView
        android:id="@+id/name_owner"
        android:layout_width="match_parent"
        android:layout_height="wrap_content"
        android:text="Name Of owner"/>

    <TextView
        android:id="@+id/desc"
        android:layout_width="match_parent"
        android:layout_height="wrap_content"
        android:text="Describe"/>
</LinearLayout>

Second, modify your item_rom.xml :
 
<?xml version="1.0" encoding="utf-8"?>
<RelativeLayout xmlns:android="http://schemas.android.com/apk/res/android"
    android:orientation="horizontal"
    android:layout_width="match_parent"
    android:layout_height="wrap_content">

    <android.support.v7.widget.CardView
        android:layout_marginBottom="5dp"
        android:layout_width="match_parent"
        android:layout_height="wrap_content">

        <LinearLayout
            android:padding="10dp"
            android:layout_width="match_parent"
            android:layout_height="wrap_content"
            android:orientation="horizontal">

                <ImageView
                    android:layout_width="100dp"
                    android:layout_height="100dp"
                    android:id="@+id/imagedetail"
                    android:src="@drawable/paketayam"/>

                <LinearLayout
                    android:layout_marginLeft="10dp"
                    android:layout_width="match_parent"
                    android:layout_height="100dp"
                    android:orientation="vertical">

                    <TextView
                        android:gravity="center|left"
                        android:layout_weight="1"
                        android:id="@+id/name_of_picture"
                        android:layout_width="match_parent"
                        android:layout_height="match_parent"
                        android:text="The Name of Image"/>

                    <TextView
                        android:layout_weight="1"
                        android:id="@+id/name_of_owner"
                        android:layout_width="match_parent"
                        android:layout_height="match_parent"
                        android:text="The owner of picture"/>

                </LinearLayout>
        </LinearLayout>
    </android.support.v7.widget.CardView>

</RelativeLayout>

Third, modify your activity_main.xml :
 
<?xml version="1.0" encoding="utf-8"?>
<RelativeLayout xmlns:android="http://schemas.android.com/apk/res/android"
    xmlns:tools="http://schemas.android.com/tools"
    android:layout_width="match_parent"
    android:layout_height="match_parent"
    android:paddingBottom="@dimen/activity_vertical_margin"
    android:paddingLeft="@dimen/activity_horizontal_margin"
    android:paddingRight="@dimen/activity_horizontal_margin"
    android:paddingTop="@dimen/activity_vertical_margin"
    tools:context="com.example.putuguna.animationwithrv.MainActivity">

    <TextView
        android:id="@+id/maintext"
        android:layout_width="wrap_content"
        android:layout_height="wrap_content"
        android:text="This is the items" />

    <android.support.v7.widget.RecyclerView
        android:layout_marginTop="20dp"
        android:layout_below="@+id/maintext"
        android:layout_width="match_parent"
        android:layout_height="match_parent"
        android:id="@+id/recyclerview"></android.support.v7.widget.RecyclerView>

</RelativeLayout>


Next process is write code for java classes. First we write code for model called ImageModel.java

package com.example.putuguna.animationwithrv;

/**
 * Created by putuguna on 02/06/16.
 */
public class ImageModel {

    private String mImage;
    private String mImageName;
    private String mImageOwnerName;
    private String mDesc;

    public ImageModel(String mImage, String mImageName, String mImageOwnerName, String mDesc) {
        this.mImage = mImage;
        this.mImageName = mImageName;
        this.mImageOwnerName = mImageOwnerName;
        this.mDesc = mDesc;
    }

    public ImageModel() {
    }

    public String getmImage() {
        return mImage;
    }

    public void setmImage(String mImage) {
        this.mImage = mImage;
    }

    public String getmImageName() {
        return mImageName;
    }

    public void setmImageName(String mImageName) {
        this.mImageName = mImageName;
    }

    public String getmImageOwnerName() {
        return mImageOwnerName;
    }

    public void setmImageOwnerName(String mImageOwnerName) {
        this.mImageOwnerName = mImageOwnerName;
    }

    public String getmDesc() {
        return mDesc;
    }

    public void setmDesc(String mDesc) {
        this.mDesc = mDesc;
    }
}


Next, modify your ImageAdapter.java. Please take a look clearly to the TAG_IMAGE_NAME. That tag taken from SecondActivity.java, it will lead the image back to the previous index after it back from SecondActivity.java

package com.example.putuguna.animationwithrv;

import android.app.Activity;
import android.content.Context;
import android.content.Intent;
import android.support.v4.app.ActivityCompat;
import android.support.v4.app.ActivityOptionsCompat;
import android.support.v7.widget.RecyclerView;
import android.view.LayoutInflater;
import android.view.View;
import android.view.ViewGroup;
import android.widget.ImageView;
import android.widget.TextView;

import java.util.List;

/**
 * Created by putuguna on 02/06/16.
 */
public class ImageAdapter extends RecyclerView.Adapter<ImageAdapter.ViewHolder> {

    private List<ImageModel> mListImage;
    private Context mContext;


    public ImageAdapter(List<ImageModel> mListImage, Context mContext) {
        this.mListImage = mListImage;
        this.mContext = mContext;
    }

    @Override
    public ViewHolder onCreateViewHolder(ViewGroup parent, int viewType) {
        View view = LayoutInflater.from(parent.getContext()).inflate(R.layout.item_row, parent,false);
        ViewHolder holder = new ViewHolder(view);
        return holder;
    }

    @Override
    public void onBindViewHolder(ViewHolder holder, int position) {
        holder.mImageProduct.setImageResource(Integer.parseInt(mListImage.get(position).getmImage()));
        holder.mNameOfImage.setText(mListImage.get(position).getmImageName());
        holder.mNameOfOwner.setText(mListImage.get(position).getmImageOwnerName());
    }

    @Override
    public int getItemCount() {
        return mListImage.size();
    }

    public class ViewHolder extends RecyclerView.ViewHolder implements View.OnClickListener{

        public ImageView mImageProduct;
        public TextView mNameOfImage;
        public TextView mNameOfOwner;

        public ViewHolder(View itemView) {
            super(itemView);
            mImageProduct = (ImageView) itemView.findViewById(R.id.imagedetail);
            mNameOfImage = (TextView) itemView.findViewById(R.id.name_of_picture);
            mNameOfOwner = (TextView) itemView.findViewById(R.id.name_of_owner);

            mImageProduct.setOnClickListener(this);
        }

        @Override
        public void onClick(View v) {
            int position = getAdapterPosition();

            ActivityOptionsCompat options =
                    ActivityOptionsCompat.makeSceneTransitionAnimation(
                            ((Activity)mContext), mImageProduct, SecondActivity.TAG_IMAGE_NAME);
            Intent intent = new Intent(mContext, SecondActivity.class);
            intent.putExtra("image",mListImage.get(position).getmImage());
            intent.putExtra("name-image", mListImage.get(position).getmImageName());
            intent.putExtra("owner-name", mListImage.get(position).getmImageOwnerName());
            intent.putExtra("desc", mListImage.get(position).getmDesc());
            ActivityCompat.startActivity(((Activity)mContext), intent, options.toBundle());

        }
    }
}


Modify your SecondActivity.java. Take a look to the TAG_IMAGE_NAME, that will leads the image back to previous place or index after press the back button from SecondActivity.java.

Flow : After you click the image from RecyclerView, automatically it brings a TAG for the image that clicked. When you press button back from SecondActivity, the TAG that brought by Image will searching where its place before.

package com.example.putuguna.animationwithrv;

import android.content.Intent;
import android.media.Image;
import android.support.v4.view.ViewCompat;
import android.support.v7.app.AppCompatActivity;
import android.os.Bundle;
import android.widget.ImageView;
import android.widget.TextView;

public class SecondActivity extends AppCompatActivity {

    public static String TAG_IMAGE_NAME = "tag_image_name";

    private ImageView mImage;
    private TextView mNameOfImage;
    private TextView mNameOfOwner;
    private TextView mDesc;

    @Override
    protected void onCreate(Bundle savedInstanceState) {
        super.onCreate(savedInstanceState);
        setContentView(R.layout.activity_detail_layout);

        mImage = (ImageView) findViewById(R.id.detail_image);
        mNameOfImage = (TextView) findViewById(R.id.name_image);
        mNameOfOwner = (TextView) findViewById(R.id.name_owner);
        mDesc = (TextView) findViewById(R.id.desc);

        String image = getIntent().getStringExtra("image");
        String imageName = getIntent().getStringExtra("name-image");
        String ownerName = getIntent().getStringExtra("owner-name");
        String desc = getIntent().getStringExtra("desc");

        ViewCompat.setTransitionName(mImage, TAG_IMAGE_NAME);

        mImage.setImageResource(Integer.parseInt(image));
        mNameOfImage.setText(imageName);
        mNameOfOwner.setText(ownerName);
        mDesc.setText(desc);
    }
}


Last, modify your MainActivity.java.

package com.example.putuguna.animationwithrv;

import android.support.v7.app.AppCompatActivity;
import android.os.Bundle;
import android.support.v7.widget.DefaultItemAnimator;
import android.support.v7.widget.LinearLayoutManager;
import android.support.v7.widget.RecyclerView;

import java.util.ArrayList;
import java.util.List;

public class MainActivity extends AppCompatActivity {

    private RecyclerView mRecyclerView;
    private List<ImageModel> mList;
    private ImageAdapter mAdapter;

    @Override
    protected void onCreate(Bundle savedInstanceState) {
        super.onCreate(savedInstanceState);
        setContentView(R.layout.activity_main);

        mRecyclerView = (RecyclerView) findViewById(R.id.recyclerview);

        mList = new ArrayList<>();
        mList.add(new ImageModel(String.valueOf(R.drawable.drink1), "Drink 1", " Putu Joli Artaguna", "This is the best drink in the world."));
        mList.add(new ImageModel(String.valueOf(R.drawable.drink2), "Drink 2", " putu guna", "This is the best drink in the world."));
        mList.add(new ImageModel(String.valueOf(R.drawable.drink3), "Drink 3", " Putu Guna", "This is the best drink in the world."));
        mList.add(new ImageModel(String.valueOf(R.drawable.drink4), "Drink 4", " Putu Guna", "This is the best drink in the world."));
        mList.add(new ImageModel(String.valueOf(R.drawable.drink5), "Drink 5", " Putu Guna", "This is the best drink in the world."));
        mList.add(new ImageModel(String.valueOf(R.drawable.paket1), "Packet 1", " putuguna.com", "This is the best packet in the world."));
        mList.add(new ImageModel(String.valueOf(R.drawable.paket2), "Packet 2", " putuguna.com", "This is the best packet in the world."));
        mList.add(new ImageModel(String.valueOf(R.drawable.paket3), "Packet 3", " putuguna.com", "This is the best packet in the world."));
        mList.add(new ImageModel(String.valueOf(R.drawable.paket5), "Packet 5", " putuguna.com", "This is the best packet in the world."));
        mList.add(new ImageModel(String.valueOf(R.drawable.drink1), "Drink 1", " Putu Joli Artaguna", "This is the best drink in the world."));
        mList.add(new ImageModel(String.valueOf(R.drawable.drink2), "Drink 2", " putuguna.com", "This is the best drink in the world."));
        mList.add(new ImageModel(String.valueOf(R.drawable.drink3), "Drink 3", " putuguna.com", "This is the best drink in the world."));


        mAdapter = new ImageAdapter(mList, this);
        RecyclerView.LayoutManager mLayoutManager = new LinearLayoutManager(getApplicationContext());
        mRecyclerView.setLayoutManager(mLayoutManager);
        mRecyclerView.setItemAnimator(new DefaultItemAnimator());
        mRecyclerView.setAdapter(mAdapter);
    }
}


That's all, hope running well.