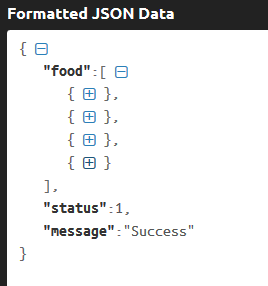
In previous posts, I have created a tutorial that show process input data to server using dummy server (apiary), means there is no data that inserted do server. Apiary was used just for testing the process of the application.
I my previous tutorial that I created using apiary as server just focused to explain about method GET and POST on Retrofit, how to send data using method GET or POST. There is no PHP file.
But, today I going to write article about how to input data to database from android application. The database using
MySQL (Localhost/phpMyAdmin) and the server made from
PHP.
To transfer data to server, on Android I using external library call
retrofit 2.0. Retrofit will helps us to send data to database.
In PHP file, I uses PDO as the way to connecting between
PHP and
database (MySQL)
Creating Database MySQL
The first thing that we have to do is creating database. You can create the database MySQL from anywhere, from example from HeidiSQL, MySQL Server or PhphMyAdmin. In this case I uses PhpMyAdmin to creating database.
Recommeded :
Android Create, Read, Update, Delete data in Firebase Firestore
1. Open
localhost/phpmyadmin (make sure your xampp has been on)
2. Then you will redirected to the page that looks like the following Figure 1. To create database, choose
New (menu in Yellow)
 |
| Figure 1 |
3. After that, write your database name and choose the type of the database. Take a look at the following Figure 2
 |
| Figure 2 |
Create database name as :
loginphpandroid
Choose the type :
utf8_general_ci
4. After your database done, now create the Table. To create the Table click menu
new below your database name. Take a look at Figure 3 below
 |
| Figure 3 |
After you click the menu
new (menu in yellow), the you will redirecting to the page where you can write your Table's name.
5. To create name of your Table, please take a look at the Figure 4
 |
| Figure 4 |
Guidelines of Figure 4 :
- Give the name of the Table as : Food
- Choose number of row in table Food
- Then choose Go
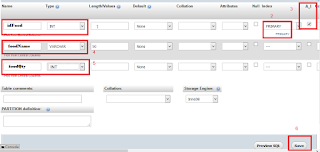
6. After the table has done, now create the attributes/row in Table
Food. Take a look at the following Figure 4.
 |
| Figure 5 |
Guideline of Figure 5 :
- Give name for the first attribute as idfood, its type : INT
- Set idfood as Primary Key
- Because the attribute idfood is primary key, then checklist A_I (Auto Increment).
- Give name for the second attribute as foodname, its type VARCHAR
- Give name for the third attribute as foodqty, its type INT
- If done, then choose Save
Oke the database is ready to use. Now time to configure code of the PHP and Android project.
PHP Code
Recommended :
Create rating and review look like Google Play Store Android
On PHP project that I created contains several PHP classes. Among that PHP files, I placed on different package. For clearly about the folder structure of the project, just take a look at the following figure 6
 |
| Figure 6 |
1. Connection.php
This file used to connecting php project that created to the database. If connected, then we allowed to input data either from Mobile or Form HTML. Below is the full code of Connection.php :
2. InsertFood.php
This file used to insert data that get from users to the database. In this data gotten from Mobile Android. Below is the full code of InsertFood.php :
Attention! There are several codes that I have to explain:
The code above created for save the response in
json form.
//cek is the row was inserted or not
if($sqlInsert){
    //success inserted
    $response["success"] = 1;
    $response["message"] = "Food successful inserted!";
    echo json_encode($response);
}else{
    //failed inserted
    $response["success"] = 0;
    $response["message"] = "Failed while insert data";
    echo json_encode($response);}
The code above will do checking. Is the input process has success or not. If success the response will like the follows :
- success = 1
- message = Food successful inserted!
When program do e
cho json_encode($rensponse), then it will displaying output json like the follows :
{"success":1,"message":"Food successful inserted!"}
If the process if falied, the the response that will like the follows :
- success = 0
- message = "Failed while insert data"
So when program do
echo json_encode($response), the output json will display like the follows :
{"success":0,"message":"Failed while insert data"}
That json response will used in mobile, and will displaying on the Toast message.
Android Code
Recommended :
Simply Login Using Firebase UI (No need API anymore)
In this project I using Retrofit 2.0 to help this project send or receive data from android to server.
1. Library
As always the first thing you do before continue project is compile the libraries that needed in the project. In this project compile the following libraries :
//add the following libraries
compile 'com.google.code.gson:gson:2.6.2'
compile 'com.squareup.retrofit2:retrofit:2.0.2'
compile 'com.squareup.retrofit2:converter-gson:2.0.2'
2. Android Manifest
On AndroidManifest add user permission for internet, look like the follows :
<uses-permission android:name="android.permission.INTERNET"/>
3. Layout
There are several layout that used in this project :
- activity_main.xml
- popup_insert_food.xml
Create layout
activity_main.xml, then paste the following code :
Next create layout
popup_insert_food.xml. This layout contains two Edit Text for
foodName dan
foodQty. In its process this layout will appears on the popup. Paste the following code :
4. Java classes
There are several java classes that need in order to do insert data to the database, there are :
- ApiService.java
- ApiClient.java
- LoggingInterceptors.java
- InsertFoodResponseModel.java
- MainActivity.java
This interface contains method that used to send data to server. Paste the following code :
This class contains the URL that used in this project. And also in this class contains initialized of the retrofit. Paste the following code :
Take a look at the URL.
192.168.43.147 is IP from my computer. And
AndroidPhpLogin my project folder that located in
localhost (htdocs). Change the IP/URL and the project folder name with your own.
This class used to save the response of the json from server (Take a look that the json that i have explained above in php code). Paste the following code :
Create class
LoggingInterceptors.java. This class used to see the output of the input process to the server.
Why use this class? Because in retrofit we will face a little bit difficulty to see the result, especially the URL and the JSON. You can see the result on logcat. The full code on LoggingInterceptor.java is like the follows :
Last is
MainActivity.java. All the process and above classes will unite in this class. The full code of MainActivity.java is like the follows :
Demikian beberapa langkah yang dapat saya sampaikan tentang cara meng input data dari Android ke Database menggunakan Server yang dibuat dari Native PHP.
That's all about the steps how to input data from android to server made from PHP and MySQL.
If there are unclear about the steps above, feel-free to asked me. Thank you.
Download the project by clicking the following image