 |
| Figure 1 |
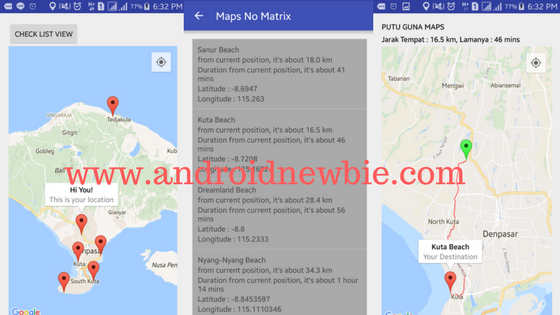
This tutorial will showing something like that. Like Figure 1, you can see how long the distance and duration to the destination. Also you can see which route that recommend by Google Maps
From the Video, is this similar as what you're looking for? If yes, please kindly follow the next steps. But if not, it's also ok for me :D
PREPARATION
1. Get the API KEY from Google
2. Start Development with Android Studio
IMPLEMENTATION
2. Get the KEY and activating the Google Maps API
Open this link : https://developers.google.com/maps/documentation/android-api/ , After in, click the GET API button at the top right side. Take a look at Figure 2
 |
| Figure 2 |
Next, create new project. The name of the project must be similar with your project in Android Studio. But it's up to you! It's ok. Take a look at Figure 3
 |
| Figure 3 |
Choose +Create a new project, Fill the project name and press button ENALBE API. After your press the button enable api, you'll given a Server Key. This Server Key that will you use and set in your AndroidManifest. Take a look Figure 4
 |
| Figure 4 |
As you can see ad Figure 4, you have got the API KEY. You also can open the console by press the button GO TO CONSOLE. Take a look at Figure 5
 |
| Figure 5 |
You can change the name. Write whatever so make you easy to remember. Because next when you have much project, you'll confusing haha. private experience.
2. Start Development in Android Studio
Before start, the first thing you have to know is the endpoint and the json format. It makes you easy to create the model class. You can check the json format here :
https://maps.googleapis.com/maps/api/directions/json?origin=-8.60815684,115.18285993&destination=-8.1246437,115.3133908&sensor=false&mode=driving&alternatives=true
Several term inside the model that you'll create must be same as the attribute name of the respon json above.
Ok, let's start. In order you don't get confuse while following this tutorial, for a while, please kindly follow my project structure. Take a look at Figure 6
 |
| Figure 6 |
Let start create the class one by one. First give some permissions on your AndroidManifest.xml and declare the API-KEY-SERVER that we have got.
Second, compile several libraries in your build.gradle (Module:app) that we'll use in this project. Look at the code below :
PACKAGE MODELS
There are some models that we'll use in this tutorial, the function of there method is to do getter and setter. Let's create one by one.
Data.java
Legs.java
Distance.java
Duration.java
DirectionResultModel.java
This class used to take route's data from json
EndLocation.java
This class used to take LatLng from the Destination (End Location)
Route.java
This class used to take all of Leg's data from json
StartLocation.java
This class used ti take LatLng's data from Origin (Start Location)
PACKAGE HELPERS
In this package contains several class.java that used to make easy development proccess
Constant.java
This class contains variables that used as key in storing data in SharedPreference and Storing URL/Endpoint
DirectionJSONParser.java
This class used to parse JSON. In this class also contains method that create polyline
LoggingInterceptorGoogle.java
As previous tutorials, class LoggingInterceptor used to make easy for debugging
Utils.java
This class cointains method SharedPreferences that used to store data
PACKAGE APISERVICES
In this package contains an interface. This interface contains method that i used to execute the URL/Endpoint that has been prepared
ApiService.java
PACKAGE ADAPTER
In this package only contains adapter class. The function of this adapter is set and show list object location
AdapterListView.java
PACKAGE ACTIVITIES
In this package contains only Activity classes
ListDestinationActivity.java
This class used to show all the destination list. Later, when we choose one location from the list, it will direct to the maps and show the route between origin and destination
ViewRouteActivity.java
This class will showing the destination, duration and route from the origin to the destination.
MainActivity.java
This class will showing the map include the marker from the list location that we have.
That's all the steps that you can follow to display distance, duration and route in Application using Google Maps.
If done, then running your project. Hope there is no error :D
EmoticonEmoticon